
OUR MISSION IS TO TAILOR FOR EACH CLIENT A BEAUTIFUL, FUNCTIONAL AND ENDURING OUTDOOR ENVIRONMENT THAT WILL PROVIDE A PLACE OF SERENITY FOR FRIENDS AND FAMILY TO APPRECIATE FOR YEARS TO COME.

BuildCal Landscape Hardscaping Article
Weeds Coming Up Between Your Pavers Why It Happens and How to Stop It for Good
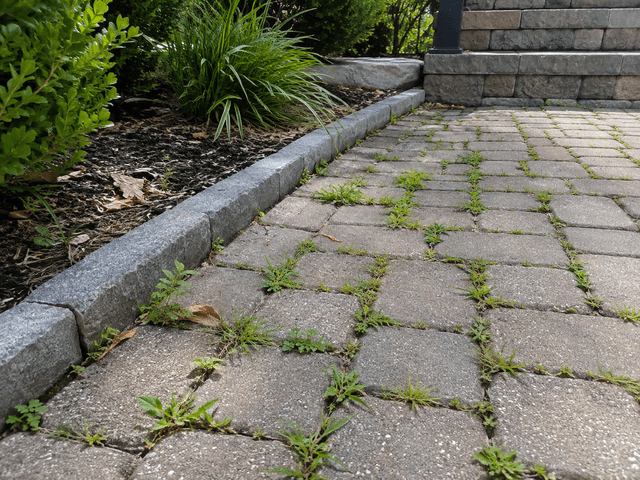
You bought pavers because you wanted a beautiful, low-maintenance surface. Then, one summer, you noticed a green sprout in a joint. Then another. Then a whole line of them. If you're spending Saturday mornings pulling weeds between pavers instead of enjoying your patio, you're not alone — and you're also not stuck with it.
Here's the honest version most quick-fix articles skip: weeds between pavers aren't really a weed problem. They're a joint problem — and sometimes a base problem underneath. Understanding the difference is what separates "pull them out again in six weeks" from a fix that actually holds. This piece covers why weeds show up, why it matters (spoiler: it's often paired with pavers shifting), what really stops them, and when your patio needs more than a top-up. For hardscape and paver work, see our paver installation services, and read on.
Why Weeds Come Up in Paver Joints in the First Place
Every joint between pavers is essentially a narrow strip of exposed material where seeds can land, moisture can collect, and roots can find purchase. Weed seeds are everywhere in the air, brought in by wind, pets, shoes, birds, and mowers. On a properly built paver surface, the joints are packed tight and stable enough that seeds don't find a foothold. On a compromised surface, they do. The specific culprits show up over and over:
- Joint sand missing, low, or the wrong type. The single most common cause. When joint sand has washed out, blown away, or was never installed to spec, weeds move in immediately.
- Organic debris in the joints. Leaves, dust, and organic matter that accumulate on the surface eventually work into the joints and become a growing medium for seeds - even over a good sand layer.
- Moisture without airflow. Shaded, damp joints stay wet longer and support germination. North-facing patios and shaded walkways see this more.
- Cracked or open joints. Wider, uneven, or open joints hold more material and more moisture - both bad on the weed front.
- Pavers shifting. Pavers that have started to move create wider joints, expose bare base underneath, and hand weeds a bigger opportunity.
Notice how many of those trace back to two things: the joint material and the base underneath. That's the honest fix - address the joint, or address the base. Anything else is a temporary retreat.
Paver Joint Sand: The Detail That Decides Everything
The paver joint sand between your units is doing more work than it looks like. It locks pavers into each other so they don't shift, sheds water rather than absorbing it, and denies weeds a foothold. When it's the right sand, well installed and maintained, weeds stop being a weekly chore. When it's the wrong sand, you'll be back at war with the joints every year.
Regular Joint Sand
Traditional paver joint sand is a fine, angular sand swept into the joints, compacted, and then wetted or left dry. It's cheap, it works passably in a well-drained low-organic-debris installation, and it's what most homeowners have between their pavers whether they know it or not.
The catches: it washes out with heavy rain and irrigation, it blows away when wind and leaf-blowers hit it, and it does very little to resist weeds seeding into the joint. Regular sand is why many patios end up with the annual weed-pull ritual.
Polymeric Sand
Polymeric sand is a mix of graded sand and polymer binders. Once swept into joints and activated with water in a specific sequence, the polymer sets and turns the joint from loose fill into a semi-rigid material that resists washout, wind, insects, and weeds significantly better than plain sand.
Advantages when it's installed correctly:
- Stays in place through irrigation, rain, sweeping, and blowers.
- Resists weeds and ants far better than regular sand - it isn't a growing medium.
- Locks pavers into each other, reducing shifting.
- Reduces the migration of joint material onto adjacent surfaces.
Not a miracle product. Polymeric sand needs to be installed on properly cleaned-out joints, over dry pavers, in the right weather (not before rain), and activated exactly per the manufacturer's method - too little water and it doesn't set; too much and it washes the polymer out of the joint before it can bind. Cheap installs where the sand is dumped in and hosed on rarely last.
Which Sand Belongs in Your Joints
For most homeowners with an existing weeds-between-pavers problem, upgrading joints to properly installed polymeric sand is the highest-leverage fix — as long as the base underneath is sound. It won't fix a base problem (see below), but it will stop the weed and washout cycle on a patio that's structurally OK. That distinction is what an on-site assessment sorts out. Our overview of paver installation walks through where jointing sits in the build.
How to Stop Weeds in Paver Joints for Good
The step-by-step of a real fix - not a top-up:
- Diagnose base and joints first. Are the pavers stable, level, and tightly seated? Or are they moving, uneven, or spreading? This determines whether the fix is joints alone or a bigger reset.
- Remove existing weeds thoroughly. Pull them out, root and all. Any left in place will regrow through fresh sand.
- Fully clean out the old joint material. This is the step homeowners skip - and it's why re-sanding without excavation fails. Vacuum, blow, and dig old sand and debris out of the joints, ideally to the depth the new sand needs to sit in.
- Let the pavers dry completely. Polymeric sand can only be swept into dry joints; moisture ruins the polymer before it sets in place.
- Install the right joint sand to spec. Sweep polymeric sand into clean, dry joints, work it in with a broom, remove all excess from paver faces, and activate with water in the sequence the manufacturer specifies.
- Maintain the surface gently going forward. Sweep and blow leaves off promptly, avoid pressure-washing joints (it can strip the sand), and refresh joints as needed over the years.
Done well, this stops the weed cycle for years, not weeks. Done sloppily, you'll be back at square one before summer's over. Our patio maintenance checklist covers the ongoing care that keeps a fixed patio fixed.
When It's Not Just a Joint Problem — It's a Base Problem
Sometimes weeds and shifting pavers together are telling you the joints are fine and the sand is fine. The problem is underneath. Paver base failure means the compacted rock and sand foundation the pavers sit on has settled, washed out, or was never installed to spec in the first place — and no amount of joint work fixes that.
Signs the base is compromised, not just the joints:
- Pavers rocking, tilting, or dipping under foot pressure.
- Whole patches of pavers sitting lower or higher than the rest.
- Wavy or uneven surface across the patio - not just one bad spot.
- Pavers spreading outward at the edges (edge restraint failing).
- Standing water pooling on the surface where it didn't before.
- Ant tunnels or piled sand around the pavers - indicating base disturbance.
- Weeds returning shortly after a competent joint refresh.
If two or three of those are present, you're looking at more than a joint job. You may need to lift the affected pavers, correct the base (rebuild the compacted rock sub-base, address drainage, re-set the leveling sand), reinstall the pavers, and then re-joint. That sounds like a lot; it is less expensive than tearing out and replacing the whole patio, and it actually solves the problem.
Cheap paver installs are especially prone to this because base and edge restraint are exactly what gets skimped when a bid gets discounted. See our note on best hardscaping materials and base practices for the invisible discipline that separates a durable install from one that fails within a few seasons.
What Not to Do (Common DIY Missteps)
Some well-meaning fixes actually make the situation worse:
- Dumping polymeric sand over wet joints or before rain. The polymer washes out before it sets and you're left with a hard mess and no functional joint.
- Pressure-washing joints. A pressure washer strips joint sand out - accelerating the problem you were trying to fix.
- Vinegar, salt, or boiling water. Kills what's there for a couple of weeks, doesn't address why weeds are coming up, and can affect adjacent planting or the joint material itself.
- Aggressive herbicide across the patio. Same problem - it doesn't stop the joint from being a growing medium, and it drifts into adjacent beds and yards.
- Re-sanding over old sand and dirt. The most common DIY mistake. New sand sitting on top of a debris layer doesn't lock or seal the joint - fresh weeds arrive on schedule.
- Ignoring shifting pavers while addressing weeds. If pavers are moving, a joint fix alone won't hold. You have to address the shift first.
Repair, Refresh, or Replace?
A quick framework for what the right call actually is:
- Joints only, minor issue: Weeds and washout, pavers stable, base sound. -> Clean out joints thoroughly and install polymeric sand to spec. This is the most common scenario.
- Joints plus a couple of shifted pavers: Localized movement, otherwise sound. -> Lift the affected pavers, correct the leveling sand or edge restraint locally, reinstall, then re-joint the whole patio.
- Broader base issues: Multiple areas rocking or sinking, standing water, spreading edges. -> Rebuild the affected sections down to the base, address drainage if needed, then reinstall and re-joint.
- Whole surface failing: Wavy across the patio, drainage problems, edges spreading everywhere. -> Full removal and reinstallation. Painful but real - and often the actual fix.
Anywhere but the top tier of that list is a pro-level job, because the base and drainage decisions that made the original install fail are exactly the ones the rebuild has to get right. Grab our free Paver Joint & Base Fix Guide - a one-page inspection worksheet covering joint state, paver movement, edge condition, drainage clues, and repair-vs-replace triggers - so you go into an assessment knowing what you're looking at.
Preventing the Problem in the First Place
If you're planning a new paver installation (or a full rebuild of a failing one), the same details that cause weeds in old patios can be avoided cleanly in a new build. What a durable, weed-resistant installation looks like:
- Proper excavation depth for the soil, use, and climate - deeper for driveways and clay soil, shallower for garden walkways.
- A compacted crushed-rock sub-base, placed and compacted in lifts, at spec depth.
- A leveling course of bedding sand at correct depth (not thicker than spec - a common shortcut that causes settling).
- Edge restraints installed continuously around the perimeter, staked into the compacted base.
- Well-chosen pavers for the hot-weather SoCal climate and use case (larger units for driveways, appropriate patterns - see our note on paver patterns).
- Polymeric sand installed correctly at the finish, on clean and dry joints.
- Drainage designed into the surface so water goes where you want it - our note on patio drainage covers this in more depth.
A patio built this way isn't magic; it's disciplined. And it's why installation quality matters far more than the paver brand. If you're comparing bids, our note on comparing quotes on diagnosis and workmanship is a useful vetting reference.
Stop Fighting Your Paver Joints
If you're pulling weeds every other weekend, or noticing pavers starting to shift, the surface is telling you something specific - and there's a real fix for it. Book a free paver assessment and we'll walk your patio or walkway, check the joints, the base, the drainage, and any movement, and tell you honestly whether it's a joint refresh, a targeted rebuild, or a full reset - so you stop patching and get a surface that stays clean. Call +1 (818) 303-1570 or contact us to schedule, and explore our paver installation and repair work.
Frequently Asked Questions
Why do I keep getting weeds between my pavers?
Weeds between pavers come from three overlapping causes: joint sand that's missing, low, or the wrong type; organic debris (leaves, dust) accumulating in joints and becoming a growing medium; and pavers shifting so joints widen and expose the base. On a properly built surface with correctly installed joint sand, weeds struggle to establish. When any of those three break down, weeds move in fast. The lasting fix addresses joint sand and, if needed, the base underneath - not just pulling the current crop.
What is the best joint sand to stop weeds in paver joints?
For most patios and walkways, correctly installed polymeric sand is the highest-leverage fix. It combines graded sand with a polymer binder that sets when activated with water, resulting in a semi-rigid joint that resists washout, wind, ants, and weeds far better than plain sand. It isn't a miracle - it must be installed over dry pavers, on cleaned-out joints, in the right weather, and activated per the manufacturer's method. Done right, it stops the weed cycle for years.
Why are my pavers shifting or wobbling?
Shifting or wobbling pavers usually indicate a base or edge-restraint problem rather than a joint issue. The compacted rock sub-base has settled or was underbuilt, the leveling sand has washed out, or the edge restraints have failed and the field is spreading. Related signs include standing water where there wasn't before, wavy surfaces across the patio, ant tunneling around units, and weeds returning shortly after a competent joint refresh. This is paver base failure - a joint-only fix won't hold.
Can I just re-sand my paver joints to fix the weeds?
Sometimes - if the pavers are stable and level, the base is sound, and you fully clean the old joint material out down to the correct depth before installing fresh polymeric sand to spec on dry pavers. Re-sanding over old sand and dirt (the most common DIY mistake) doesn't lock the joint and weeds return quickly. If pavers are moving, the joint fix won't hold and you're looking at a targeted rebuild instead.
When should I repair paver joints vs replace the whole patio?
Joints only: weeds and washout with stable, level pavers on a sound base - clean out and re-joint. Joints plus a few shifted pavers: lift, correct locally, reinstall, re-joint. Broader base issues (multiple areas rocking, standing water, edges spreading): rebuild the affected sections. Whole surface failing (wavy across, drainage problems, edges spreading everywhere): full removal and reinstall. Book a free paver assessment at +1 (818) 303-1570 to get an honest read on which tier your patio is at.
Thinking about a new outdoor space?
We’d love to hear your ideas. Let’s explore what’s possible—no pressure, just a friendly conversation.
Give us a call:
+1 (818) 303-1570
Frequently Asked Question
CAN YOU GIVE ME AN ESTIMATE FOR MY PROJECT DURING THE INITIAL CONSULTATION?
No, Too often a landscape contractor will come to a site and immediately give a potential client a price without first knowing all the details of that project. Our first question is always, “What is this estimate based on?” Before making out a bid of any sort, we must first discuss all the work to be done, the planting and construction materials necessary, and the labor involved. After which we do a breakdown and present to you a complete and itemized preliminary estimate. As our client you will be able to see, not only how much your project will cost, but also where every dollar will go.